Let’s see How to Change Ink in Canon Printer? Inkjet printers are a popular pick for home and office users because of their low, upfront cost and the convenience of printing without going to a store. But after a while, the ink in these printers runs out, and you have to fill it again.
Changing the ink cartridge is a simple process that only takes a few minutes. You’ll be up and printing again in no time!
Steps to Change Ink in Canon Printer
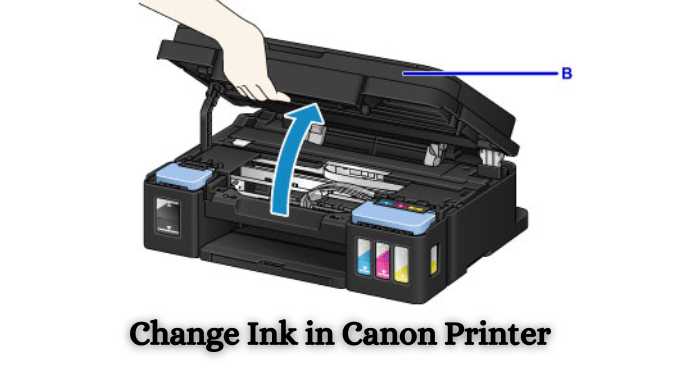
- open the access door of your printer
- Locate the ink cartridge that contains the expended ink cartridge and press the locking lever on the side of the ink cartridge to unlock it. Once unlocked, lift from the middle of the ink cartridge to open it and remove all four cartridges from its compartment.
- If you have a tri-color pack, remove the three cartridges together. If you have a gray cartridge, remove it by itself.
- Once all cartridges are removed, please place them in their original packaging for safekeeping.
- Determine which ink cartridge needs to be replaced and lift its cover to open it. Unwrap the new ink cartridge(s), and remove the protective tape from the cartridge’s contact points. Place it back in its compartment, matching the color-coded icons with those on the printer.
- Once all new ink cartridges are correctly installed, close the cartridge door firmly until you hear a click sound to indicate that it is securely closed.
- Open your Canon Printer Software or the Printing Preferences window (depending on your printer model and operating system). Click the Maintenance or Setup button in the bottom right corner of the window.
- Click Ink Cartridge Replacement under Maintenance, and click Ok when prompted to begin ink cartridge replacement before clicking Ok again.
How do I Clean an Inkjet Printer?
- Cleaning the exterior of your printer will remove any loose dirt and debris that may have collected on its surface and prevent dust from accumulating inside the printer.
- Use a soft cloth to wipe the row of buttons at your printer’s top. You can also use this for the power button.
- Use a can of compressed air to clean out dust particles located inside the printer. Make sure that the air coming out is not too strong. Otherwise, you might damage your printer or blow ink into other parts of its assembly. You can also use this to clean the print head and cartridge contacts.
- Apply glass cleaner on a clean cloth and wipe the plastic cover of the LCD screen.
- Use a cotton swab dipped in isopropyl alcohol if your printer has an inkjet head cleaning option under Maintenance or Setup. Run it through at least three times to remove dried-up ink.
How to Install a Refill Ink Cartridge?
Installing a refill ink cartridge is just as easy as changing the regular one but usually takes longer than ten minutes. Here’s what to do:
- Remove the empty cartridge from your printer and dispose of it properly. If you want to save money on purchasing cartridges, recycle them.
- If you have an air compressor, clean the print head with it to remove any dust particles accumulated during shipment using a soft cloth.
- Prepare the refill ink kit, typically in a syringe or dropper bottle(s). You also need to have cotton swabs ready if the instructions say so.
- Open the cartridge cap and put one ink drop on a non-absorbent surface, like a paper towel or CD. Please do not touch the ink since it may stain your hand or fingers. Use a cotton swab to ensure the droplet is about 1/2 inch in diameter, and apply another drop when the first one is dry.
- Put the dropper or syringe in front of an air vent so that air can enter it. If you do not have a vent nearby, keep shaking the bottle until the ink trickles out from the needle.
- Apply pressure on the plunger until a drop of ink starts to form.
- Insert the needle into the refill port slowly until it is about 1/4 inch deep. Ensure you do not press too hard because it might drip down and create a mess. Once the bottle stops dripping, take the needle slowly and put a new droplet on another clean surface.
- Dispose of the cartridge correctly.
- Repeat steps 4 – 8 if necessary.
- Ensure the refill plug is closed before reinstalling it to your printer.
FAQs:
Q1.How often do you need to replace an ink cartridge?
Replacing ink cartridges is recommended once they show low ink levels. You can check them by opening the Printing Preferences window (depending on your printer model and operating system). Click the Maintenance or Setup button in the bottom right corner of the window, then click Ink Cartridge Replacement under Maintenance.
This will tell you how much ink is left in your installed ink cartridge and whether you need to install a new one.
Q2. What would be the actual cost of replacement per ink cartridge?
Each color or black ink cartridge’s cost varies depending on its make and model. Sometimes, paying for toner refills is more economical than buying a whole new set of printer cartridges.
Q3. What happens if I install the wrong cartridge color?
If you installed an ink cartridge on the incorrect slot, your printer would not print anything until you replaced the cartridge with the correct one.
Q4. Why do multiple cartridge replacements happen?
A cartridge may need replacement if the printer detects the color levels are low or empty. However, this does not mean you must change them all at once.
Q5. How do I set the printer not to show a cartridge replacement warning?
Not all printers have this option, but if yours does, activate it by holding down the power button for 3 seconds and then press OK. The message should appear again the next time you restart your printer.
Q6. How do I install an ink cartridge on a printer without slots?
Some printers have non-detachable cartridges, but this does not mean they cannot be replaced if they run out of ink or are damaged. You first need to open your printer’s front door or cover and remove the cartridge holder on the left side, depending on its type. Please remove the old cartridge, dispose of it properly, and connect a new one.
Conclusion
we have walked you through filling an inkjet printer by yourself. By doing this, you can save a lot of money without worrying about going to a store for expensive cartridge replacements.